MAKE YOUR CASE: HOME-MADE PRESENTATION CASES FOR BLACK POWDER REVOLVERS
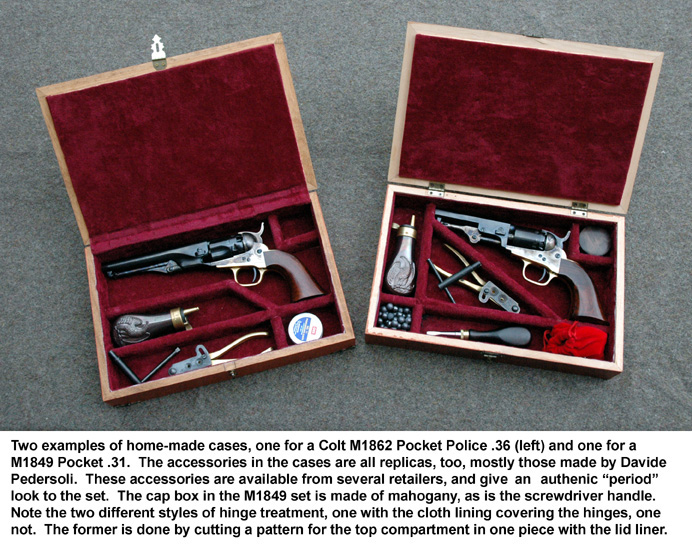
Modern handgunners have it soft. All they really need is a gun, some ammunition, a place to go, and they can shoot. In the Good Old Days things weren’t so simple: making a cap-and-ball revolver go BANG took a bit of work and a fair amount of kit. That’s why it was customary to ship guns from the factory as a “cased set,” including all the tools necessary to maintain and fire the weapon, and sometimes a complete set of instructions on how to do so. Cased sets typically included the gun, a screwdriver and/or nipple wrench, a powder flask, a tin of percussion caps, usually a bullet mould to make projectiles and other accessories, such as a cleaning rod and oil bottle. Even after the development of self-contained ammunition wasn’t unusual for manufacturers and retailers, especially those dealing with the “carriage trade,” to case their products.
Nowadays guns come in sturdy, utilitarian boxes. Most manufacturers use cardboard, a few injection-moulded plastic; the only real function either type has is protecting the gun during shipment. They aren’t very attractive and usually they’re discarded. Shooters using modern black powder replicas, however, face the same dilemma as their great-grandfathers: keeping all the stuff needed to make the thing work in one convenient space. Commercially made compartmented cases for replicas are available for a few  popular models, but they’re very expensive and hard to find. The solution is to make your own, a surprisingly easy and inexpensive project. In a few hours’ time you can have a custom fitted case for your handgun that will be a fair replica of those of the past.
The first step is to gather together the tools and materials. Most of these are available in any good hobby shop or hardware store if you don’t have them already: a coping saw, razor knife, some sandpaper, good wood and hobbyist’s glue and some brushes. Add to this a yard of plush material of an appropriate shade, some stain, varnish, or paint, and a few strips of lightweight wood for the interior case partitions, and you’re ready to start.
Choosing the case to work with is the most important step. You want something sound and strong and reasonably attractive in it's own right. 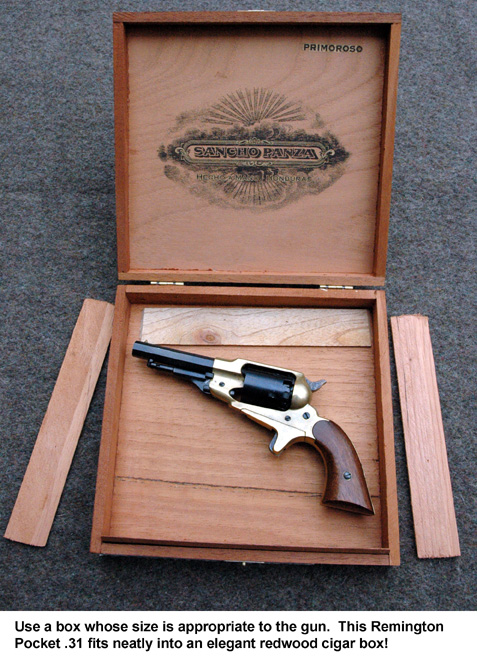 Suitable cases are where you find them: high-quality wooden cases originally used for tableware, jewelry, or similar things, are easily and cheaply obtained in thrift shops, flea markets, and second-hand-stores. And don’t overlook cigar boxes! Many high-grade cigars are packed in elegant wooden humidors which finish up beautifully. Pick a box suited to the size of the gun you want to put in it with extra room for its accessories. Make sure it has sturdy and functional hardware: boxes with full-length “piano” hinges are especially good. Don’t worry about the exterior finish, so long as the box is sound and well-made. You’ll sand and re-finish it anyway. Interior compartments and partitions will be removed and replaced.
Once you’ve selected a box, do some layout work with the gun and accessories. Place the gun in the box in the approximate position it’s going to occupy in the finished product, and start deciding where the partitions should go. This is limited only by your imagination and what you want to include in the set. For black powder revolvers, it’s customary to have a separate compartment for the cap tin, one for the cleaning tools, and one for a bullet mould. Not many 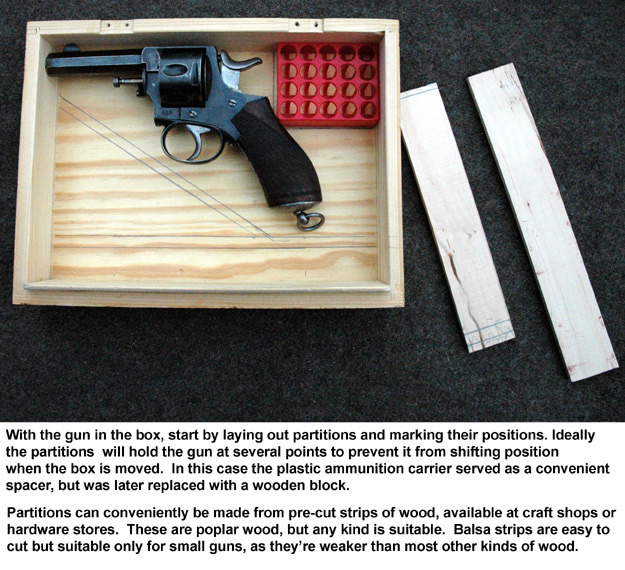 people will want to go to the trouble of actually casting balls with the small brass-handled moulds that replicate the originals—unless you really like getting second-degree burns on your hands these moulds are pretty worthless—but they’re an attractive accessory and such moulds were usually included in original sets. Similarly, there should be a compartment for an appropriately-sized powder flask.
Cases for cartridge handguns are typically fitted with a cartridge block. This is a separate piece that gets glued into place, and is bored with holes of a correct size to take the ammunition the gun uses. Smaller caliber guns often held as many as 25-50 rounds, but it’s typical for a six-shot revolver to have a block holding 6 to 24 cartridges, depending on the space available.
 For this article I chose to case an interesting revolver dating from the 1890’s, a Belgian-made copy of the Webley Model 1883 Royal Irish Constabulary. The box was purchased for $2 at a local thrift shop. Since this box was made of knotty wood that didn’t take stain well, I decided to paint and lacquer it. After cutting mortises for the lid hinges with a small chisel, I was ready to start the process of laying out the partitions. The partitions were made of poplar strips about an inch and a half wide and 3/8 inch thick, purchased at a local store, and glued into place with carpenter’s glue after cutting and positioning. Using a pencil and a ruler I marked and cut the pieces to length, marked them for the connecting angles, and positioned them in the box, then glued them down along the lines marked on the bottom. Two pieces of scrap pine were used to make the cartridge block. The top piece was drilled for nine rounds and then glued to the bottom piece; the total thickness was chosen to bring them to the top of the interior of the box and to leave the cases deep enough not to interfere with closing the lid. Any wood will do for this purpose. It’s nice to have a drill press to line the holes up perfectly, but it can be done with hand tools.
 With the partitions in place it was time to make paper patterns for the lining material. A local fabric store supplied me with a yard of inexpensive synthetic pile plush, which comes in various colors. Traditional colors include deep red, dark blue, green, and black. I also bought a piece of leatherette, which can be used instead of plush, but which I put on the bottom of the box as a scuff protector. The box also received its final finishing at this point: one the plush has been cut and is ready to glue down, you can’t do that without damaging it.
Probably the fussiest part of the project is making the lining patterns. Ordinary typing paper, cut and fitted into each space, and taped to form each pattern, works fine. Just be sure to cover every square millimeter with the paper, and to sure you know which side of the pattern is “up” (i.e., facing the interior of the box). When the patterns are attached to the plush, they have to be oriented correctly: I make notes on the patterns themselves as a guide for placement and cutting. Patterns get transferred to the plush, and trimmed out with sharp scissors. I use a stapler to hold the patterns in place: the holes the staples make are very small and disappear when they’re removed, plus staples are stronger and  easier to apply than conventional pins would be. It’s best to make as few pattern pieces as possible: one large complicated shape is often easier to cut and fit than several smaller ones. If you plan to cover the hinges, make a single pattern for the top compartment and the inside of the lid, so that the fabric is continuous from one part to the other.
Cut the plush and remove the pattern paper, then start gluing it in place in the box very carefully, paying particular attention to keeping it smooth and butting the seams and angles perfectly to avoid unsightly gaps. A word about the glue: while wood glue is needed to install the partitions, it isn’t suitable for this job. “Crafter’s glue” is found in hobby shops and stationery stores. It should be water soluble, and must be the type that dries clear. It should be of a consistency that’s easily spread with a small brush, but not so runny as to cause drips. It should remain tacky for several minutes after application so you can adjust the plush pieces.. Be very careful to fill in all corners and angles with the glue, and to avoid dabbing any on the pieces of plush previously laid down. After gluing the plush in place, and  allowing it to dry, reassemble the box and lid,
 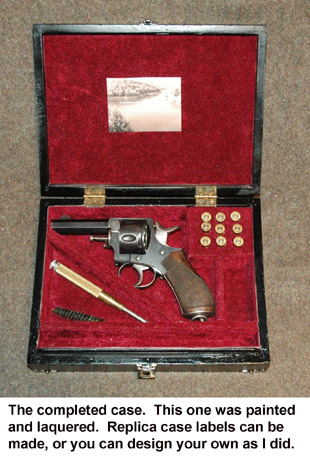 and any additional hardware such as corners or latches you may want to use. Manufacturers and retailers often glued a label to the interior of the lid. Since I’m pretty handy with Photoshop, I designed my own for the fictitious “New River Armoury,” as a final touch.
The case constructed here was done in the “English” style widely used for cased sets in the mid 19th Century. Often for cartridge guns the interior of the box is finished, and only the sides are lined, not the bottom. Sometimes leatherette is used as lining instead of velvet or plush.
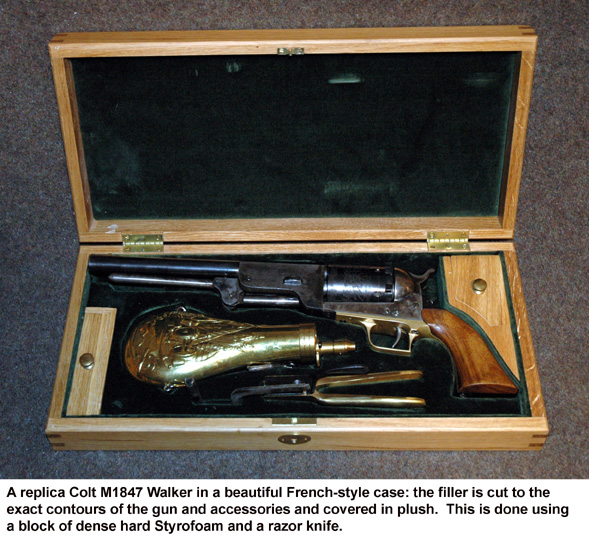 The “French” style case like the one at right uses a completely filled box interior, with the recesses for all the pieces of the set contoured to fit them exactly, and cut into the fill material. You can use Styrofoam blocks from a florist or craft shop to make French style cases, and glue the plush to that, then glue the whole assembly into place. It takes some skill with a razor knife to do this type of box, but the results are very gratifying. The options are endless, and a look through collectors’ books and sales catalogues will give you any number of ideas on what type of case might best suit the gun you have in mind. Making cases like this is easy and adds a touch of elegance to replica guns that cardboard boxes just can’t supply.
| HUNTING | GUNS | DOGS |
| FISHING & BOATING | TRIP REPORTS | MISCELLANEOUS ESSAYS |
| CONTRIBUTIONS FROM OTHER WRITERS|
| RECIPES |POLITICS |